 WebIssues Manual
Version 1.1.5
If you are using the Desktop Client, you can manage projects and folders directly from the main window of the program. The relevant commands are available if you activate the project tree by clicking on it. In case of the Web Client, select the Manage Projects command, located above the projects tree, to manage projects and folders.
If you are a system administrator, you can manage all projects and create new projects. If you are the administrator of a project, you can manage its members and folders.
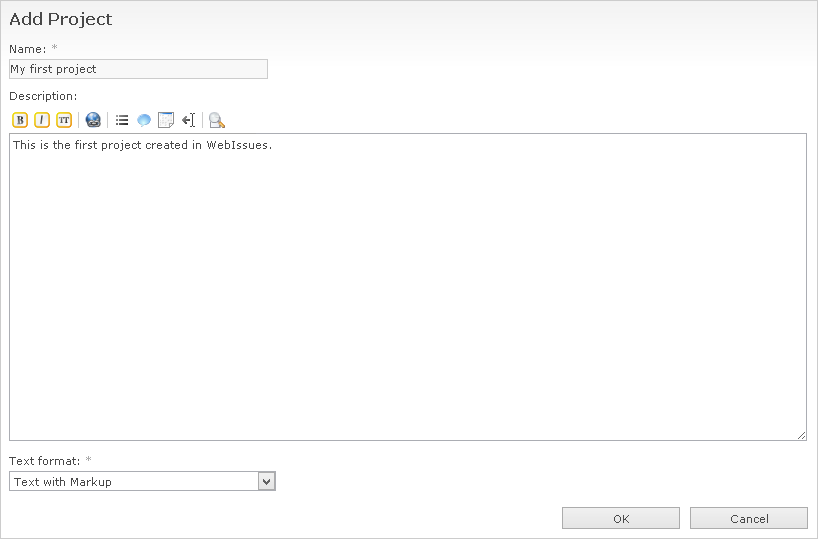
To add a new project, select Add Project, enter the name and optional description of the project and click .
The system administrator can change the name of any project. To do this, select the project and click Rename Project. You can also delete projects using the Delete Project command. If the project is not empty, a warning will be displayed.
Warning
When deleting projects or folders, pay special attention whether you are not mistakenly deleting the wrong data. All issues contained in them are permanently and irreversibly removed from the system, and it's not possible to restore them. You can archive a project instead of deleting it to make it possible to restore it later if necessary.
The project description is displayed when the project is selected in the projects tree in both the Web Client and the Desktop Client. It can be used to provide information about the project, including links to important issues or external resources. Both system administrators and project administrators can add a description to an existing project, edit the description and delete it. Project descriptions use the same format as issue descriptions and comments; see the section called “Comments and descriptions” for more information.
To add a new folder, select a project and click Add Folder.
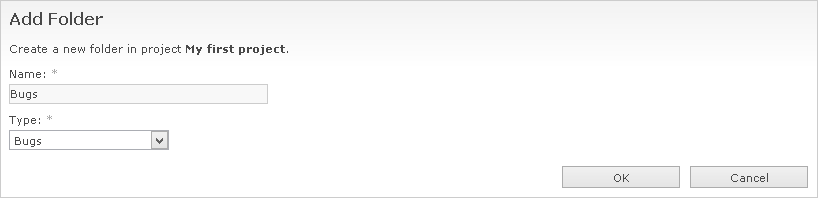
When creating a folder, you have to give it a name that is unique within the project and select the type of issues that will be stored in it. After creating a folder its type can't be changed. However, you can rename a folder using the Rename Folder command and delete it using the Delete Folder command.
You can also move a folder from one project to another. In order to do this, you must be the administrator of the system or of both projects — the source one and destination one. Select the folder you want to move and click Move Folder. Then select the destination project from the list and click .
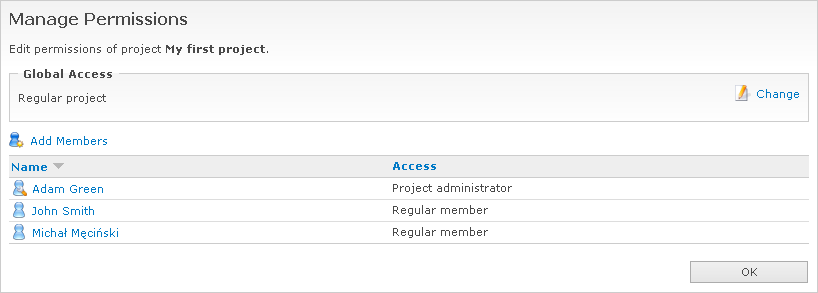
After creating a new project, no regular users have access to it. To manage user privileges for specific projects, go to Manage Projects from the main window, select the project, and then click Manage Permissions. In case of the Desktop Client, this command is available directly from the main window if you activate the projects tree.
There are two global levels of access for projects:
- Regular project
-
Regular projects are only visible to system administrators and regular users who are members of the project. All new projects are regular projects by default.
- Public project
-
Public projects are visible to all users in the system, including both system administrators and regular users. There is no need to explicitly grant access to individual members, except for project administrators. This is useful for projects containing common data, such as discussion boards, and also when it's not necessary to restrict user permissions for individual projects. Also, when anonymous access is enabled, the project can be accessed in read only mode without logging in to the system.
To change the global access of a project, click the Change command in the Global Access section. Then choose the new level of access and click .

You can also assign specific access for the project to individual users. There are two levels of access for project members:
- Project administrator
-
Project administrators can manage permissions and folders of the project. They can also delete or move issues and edit and delete all comments and attachments within the project. Finally, they can manage public alerts and modify the project description.
- Regular member
-
Regular members can view issues in all folders, manage their own alerts, and create new issues and edit existing ones. They can also add comments and attachments, and edit and delete their own comments and attachments.
The global permissions of the user are always more important than permissions for a given project. A system administrator automatically becomes the administrator of all projects, and a disabled user has no access to any project. Regular users only have access to public projects and regular projects that they are members of, according to the permissions that were assigned to them.
To add new members to the project, select Add Members.
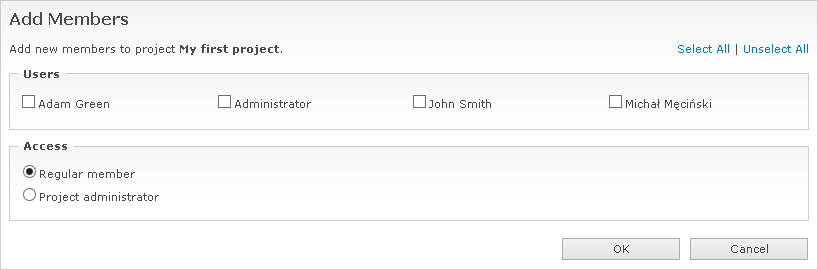
Select one or more users who are not yet members of the project. Then select the appropriate level of access and click .
To change the access for an existing member, select the member on the list and click Change Access. Then select the new level of access and click . You can't deprive your own project administrator rights, unless you are a system administrator.

To remove a member of the project, select the member on the list and click Remove Member. In case of the Desktop Client, you can choose several members on the list, and change their access or remove them from the project simultaneously.
When a project is no longer needed, it is possible to remove it without permanently deleting it. When a project is archived, it is removed from the projects tree and no one can access any folders and issues in that project. However, unlike deleted projects, archived projects can be restored at any time. Only system administrators can archive and restore projects.
To archive a project, go to Manage Projects from the main window, select the project, and then click Archive Project. In case of the Desktop Client, this command is available directly from the main window if you activate the projects tree.
Tip
It is not possible to archive individual folders, but you can create a new project, move the folder or folders that you want to archive to that project, and then archive the project.
To open a list of archived projects, go to the Administration Panel and click Projects Archive. This function is not available in the Desktop Client.
To restore an archived project, select the project and click Restore Project. The project will be removed from the list of archived projects and will appear in the projects tree. The folders, issues, permissions, alerts and other information related to the project will be preserved.
To permanently delete an archived project, select the project and click Delete Project. In that case it will no longer be possible to restore any information associated with the project. You can also use the Rename Project command to rename an archived project and the View Description command to view the description of the project, if available. Note that it is not possible to access any folders and issues or to modify the project while it's archived.