 WebIssues Manual
Version 1.1.5
After ensuring that the required components are installed and configured, and creating the database, you can proceed to the installation of the WebIssues server itself.
Download and unpack the WebIssues server package — it contains a directory named webissues-x.y (where x.y is the version of the package). Then move all files and subdirectories from that directory to the root directory of the web server. External hosting services typically use the FTP protocol for copying files to the server, so you'll need an FTP client.
Note
It's possible to install WebIssues server along with the other web sites and applications operating on the same computer. You can install the server in a subdirectory located in the root directory of the web server, as well as on a virtual host or in a virtual directory. Refer to the documentation of your web server or hosting service for more information.
You can also create multiple separate instances of the WebIssues server in a single installation. Individual instances can be accessed through different domain names or subdomains, or in different virtual subdirectories. For more information, please visit http://wiki.mimec.org/wiki/WebIssues/Configuration.
Then make sure that the web server user account has write permission to the data/sites subdirectory. To do this, use the file manager or the FTP client, or run the chmod command from the command line. A configuration file will be created in this directory during the installation. Also files attached to the issues will be stored there.
Warning
Make sure the data and common/data directories are protected from unauthorized access from the web. Otherwise it will be possible to download attachments without proper authorization. If you're using Apache, you can use the .htaccess files which are included in the source package for that purpose. For more information, visit http://wiki.mimec.org/wiki/WebIssues/Installation.
After the installation, also make sure that the WebIssues system configuration file is protected against unauthorized access, since it contains the username and password used to connect to the database. This is particularly important when using public hosting services.
To ensure maximum security, it's recommended that configuration files and attachments are not stored in the data directory, but in a different location, outside the root directory of the web server. More information about changing the location of the directory containing these files can be found at http://wiki.mimec.org/wiki/WebIssues/Configuration.
Now you can open the homepage of the WebIssues system. Launch your favorite web browser and enter the URL of the server, for example http://www.example.com. You should see the following message:

If you follow the instructions and click on the link, you will be prompted to select the language that will be used during the installation. It will also be the default language in which the WebIssues system will display all messages.
In the next step of the installation, basic information about your server will be displayed: the name of the instance (usually default, unless you create multiple instances of the server within a single installation), the base URL of the server and the path of the directory in which the configuration file will be created. You will also see the version of PHP, the web server and the operating system, and the name of the computer on which you're installing WebIssues. After verifying this information, proceed to the next step.
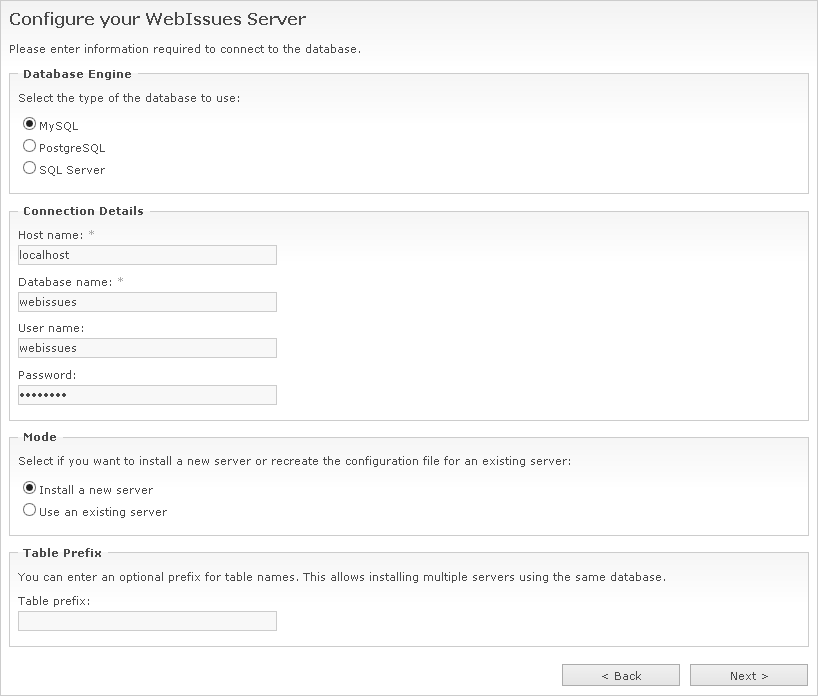
You will be asked to enter information necessary to connect to the database that you previously created. Select the type of the database, then enter the host name of the database server, if it's located on a different computer than the web server, the name of the database and the login and password of a user with the right to create tables in the database. In case of SQL Server, you can leave the user name and password blank to use integrated Windows authentication.
Leave the Install a new server option selected if you are creating a new server. If you want to create a new configuration file for a previously created server instead, select the Use an existing server option. In that case, you will not be prompted for the parameters of the server and the database will not be modified, unless it needs to be updated to a newer version.
Note
You can also specify a prefix which will be added before the names of all tables and other objects in the database. For example, if you choose wi_ prefix, tables will be named wi_server, wi_users, etc.
By choosing a unique prefix, you can install many different applications using a single database. You can also create several separate instances of the WebIssues server in a single database.
Enter the necessary information and proceed to the next step. The WebIssues system will try to connect to the database server, and in case of an error it will display an appropriate message. If the connection succeeds, you will see the following page:
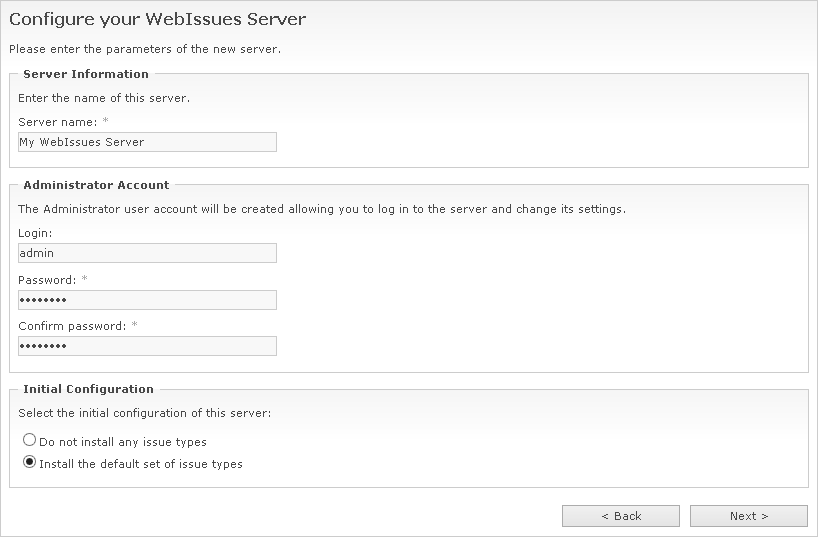
Enter the name of the server which will be visible to all users in the title bar. Also enter the password for the Administrator account, which you can later use to log into the server and change its settings.
By default, the installer will create several predefined types of issues and views. You should leave this setting to quickly start working with the system. Later you will be able to freely adjust and even remove those built-in types. However, if you want to manually create all types of issues from scratch, select Do not install any issue types.
Go to the next page, which contains a brief summary of the operations that will be performed. Click to begin the installation. This may take some time. If the installation is successful, a message will appear and you can start using the system.
Tip
In order to create a new configuration file in the future, for example after moving the database to another server, simply delete the configuration file. Then you will be prompted to run the installer which will let you create a new configuration file with appropriate settings.