 WebIssues Manual
Version 1.1.5
Individual users of the WebIssues system can customize the regional settings — the language, time zone and format or numbers, date and time. Users of the Web Client can change the preferred number of projects displayed on a page of the projects tree, number of issues displayed on a page of the list of issues and number of elements on a page of the issue history. In the Desktop Client, you can change the user interface settings, fonts, intervals of updates, etc.
Tip
For more information about changing the default WebIssues system settings for all users, as well as other possibilities of customizing and configuring the system by the administrator, see Chapter 6, Customizing the system.
To change the user preferences in the Web Client, click Tools and then User Preferences. In the Desktop Client, the User Preferences command is available directly from the main window's toolbar.
The Regional Options allow you to select the language for the Web Client (after logging into the system), and the language in which you will receive email notifications. In case of the Desktop Client, the language of the user interface depends on the program settings and do not change when you connect to a server. Use the WebIssues Settings command (see below) to change these settings.
You can also select your preferred time zone. This setting determines the time zone for dates displayed in the Web Client, and for email notifications. However the Desktop Client always displays dates according to local time zone the computer on which it is running, and it does not take into account server settings or user preferences.

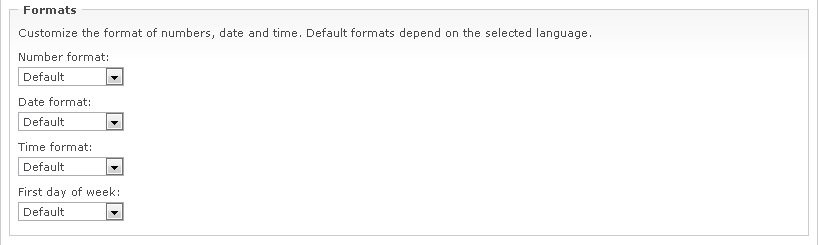
The format in which numbers, dates and times are displayed, and the first day of the week in the calendar, depend on the current language of the user interface. You can change these settings using the Formats group of options. These changes will impact both the Web Client and the Desktop Client (after connecting to the specific server).
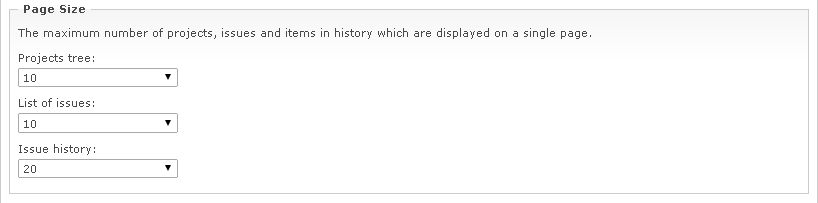
Using the Page Size options, you can specify the number of issues to be displayed on a single page in the projects tree and list of issues, and the number of elements per page in the issue history. These options only affect the Web Client, because the Desktop Client always displays all projects, all issues and the entire history without pagination. These options also have no effect in the mobile version, for which the page size is configured separately by the system administrator.
Options in the View Settings group make it possible to select the order in which changes are displayed in the issue history view. Also it is possible to select the default filter in the issue history; you can display all history or just comments and attachments. The default values of these options depend on server settings.

You can select the default format of text used for new descriptions and comments. Use Plain Text if you don't want any formatting or Text with Markup if you want to use simple formatting tags. Note that when editing existing comments and descriptions, the original format will be preserved by default. The default value depends on the global server setting.

If the administrator of the WebIssues system enabled email notifications, you can also configure these notifications in the preferences window. For more information, see the section called “Managing alerts”.
The system administrator can not only change the global settings, but also the individual settings for any user. To do this, open the list of user accounts, select the user whose settings you want to change, and use the User Preferences command.
To change the Desktop Client settings, click the little wrench icon in the right upper corner of the window. These settings do not depend on which WebIssues server you are connected to; they are stored on the local computer. You can change them even if you are not connected to any server.
The first tab contains basic program settings:
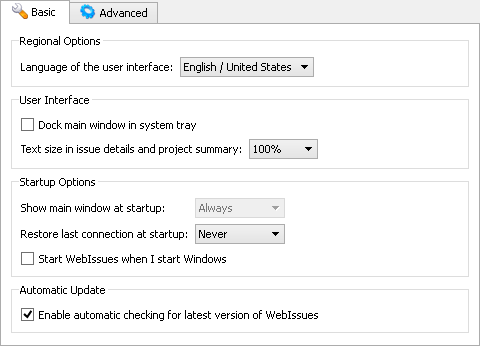
The Regional Settings allow you to select the language of the user interface for the Desktop Client. By default, it depends on the operating system settings. After changing the language you must close and restart the program.
If you enable the Dock main window in system tray option, the program keeps running in the background even when you close the main window. You can always re-open this window by clicking on the icon in the system notifications area. To exit the program, instead of closing the window, click the button, available in the upper right corner of the window when you enable this option.
You can use the Text size in issue details and project summary to change the font size in the issue details view and the project summary view. If the font is too small, you can set it to 125% or 150% depending on your needs.
The Startup Options allow you to specify the behavior of the program when it is started. If the main window is docked, you can specify whether it is always visible at startup, always hidden, or either visible or hidden depending on its state when the program was closed. You can also specify whether the program should automatically connect to the last used server, display the server selection window, or connect only if it was connected when closing.
In case of the Windows system, you can also specify whether the Desktop Client should be automatically run whenever you log into the system. This allows you to configure the program to be always running, connected to the server and instantly available.
If the Enable automatic checking for latest version option is active, the program will notify you if a newer version available. If you disable this option, you can still manually check if an update is available. To do this, open the window with information about the program. In the Web Client, click Tools and then About WebIssues if you are the system administrator. In the Desktop Client, click the question mark icon in the upper right corner of the window or press F1. Then click the button. If an update is available, you can open a page containing information about it, and also a page that allows you to download it.
The second tab allows you to change more advanced settings of the Desktop Client:
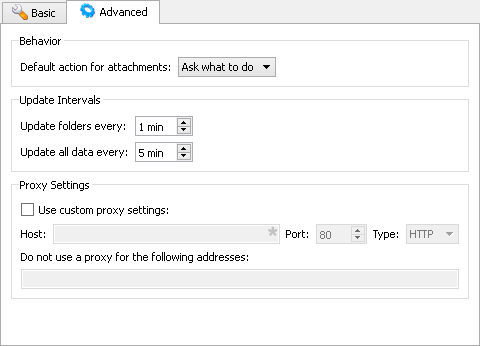
The Behavior group of options allows you to select the default action when you click on a link to an attachment. By default the program will ask whether you want to open it using the default application, or save it in a selected location on the disk. You can also right-click on the link to quickly select the desired operation.
The Update Intervals determine the intervals at which the program automatically retrieves data from the server (in minutes). The first interval determines how often the program updates the tree of projects and folders, lists of issues and the state of active alerts. The second interval specifies how often it updates issue types, views and other data that do not change very often.
The Proxy Settings allow you to define the parameters of the proxy server, which will be used to connect to the WebIssues system. On Windows and OS X it will automatically detect your system settings, so manual configuration is usually not necessary. However, in case of Linux, you must enter the connection parameters if you want to use a proxy. If the proxy requires authentication, you will be prompted for a username and password when opening a connection.